Simple Way to Make Quick Ice Cream Tart With Grown-up Persimmon Flavor

Simple Way to Make Quick Ice Cream Tart With Grown-up Persimmon Flavor

Ice Cream Tart With Grown-up Persimmon Flavor.

Ice Cream Tart With Grown-up Persimmon Flavor

Hey everyone, I hope you are having an amazing day today. Today, I'm gonna show you how to make a special dish, ice cream tart with grown-up persimmon flavor. One of my favorites food recipes. This time, I'm gonna make it a little bit unique. This will be really delicious.

Ice Cream Tart With Grown-up Persimmon Flavor is one of the most popular of recent trending foods on earth. It's appreciated by millions daily. It's easy, it's fast, it tastes delicious. Ice Cream Tart With Grown-up Persimmon Flavor is something that I've loved my entire life. They are fine and they look wonderful.

To begin with this particular recipe, we have to prepare a few ingredients. You can have ice cream tart with grown-up persimmon flavor using 7 ingredients and 8 steps. Here is how you cook it.

The ingredients needed to make Ice Cream Tart With Grown-up Persimmon Flavor:

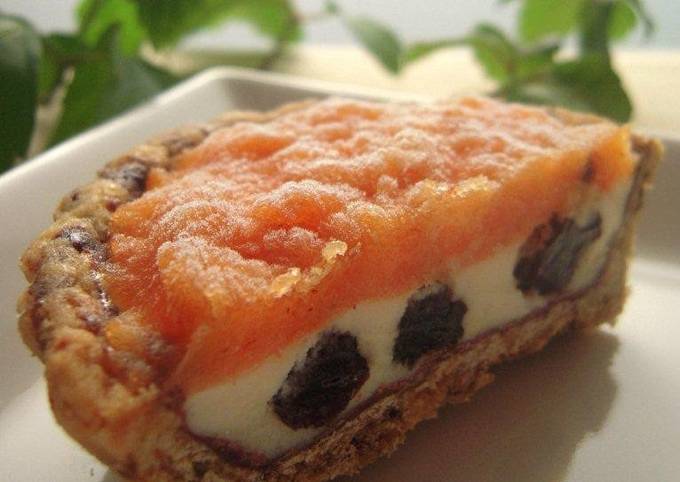
  1. {Prepare 1 of the recipe will make enough for the tarts + 4-5 cookies Coffee tart crust.
  2. {Take 1 of Chocolate (dark).
  3. {Get 1 of Persimmon puree.
  4. {Make ready of For the rum raisin ice cream:.
  5. {Prepare 1 of Store-bought vanilla ice cream.
  6. {Take 1 of Rum soaked raisins.
  7. {Get 1 tsp of Rum.

Instructions to make Ice Cream Tart With Grown-up Persimmon Flavor:

  1. Bake the small tarts very well so that they are quite hard. Let them cool completely, and then remove from the molds..
  2. Dissolve the chocolate in a small bowl suspended over a hot water bath, spread it thinly in the tarts from Step 1. Refrigerate the tarts for a while to let the chocolate completely harden..
  3. Mix the rum and raisins together into the vanilla ice cream to make the rum raisin ice cream. This is what I used this time, but you can of course use home-made ice cream instead..
  4. Pour the Step 3 ice cream into the Step 2 tarts, and level out the surface. Make sure to let the ice cream thoroughly harden in the freezer this time..
  5. Finally, spread the persimmon puree onto the surface and place once again into the freezer to harden. The tarts are done..
  6. The rum raisin ice cream and persimmon really go well together. I think the bitterness of the chocolate and coffee tart crust work together to give it an even more grown-up taste..
  7. Here is my recipe for rum soaked raisins: "Fruity Rum Raisins". https://cookpad.com/us/recipes/145613-my-own-fruity-rum-soaked-raisins.
  8. I also recommend checking out "Ice Cream Tart Number 2 Chocolate Pistachio". https://cookpad.com/us/recipes/145621-chocolate-pistachio-ice-cream-tart.

So that's going to wrap this up for this special food ice cream tart with grown-up persimmon flavor recipe. Thank you very much for your time. I'm sure you can make this at home. There's gonna be interesting food at home recipes coming up. Remember to bookmark this page on your browser, and share it to your family, colleague and friends. Thank you for reading. Go on get cooking!

Simple Way to Make Perfect Leftover Thanksgiving Turkey and Mushroom
Fried Rice

Simple Way to Make Perfect Leftover Thanksgiving Turkey and Mushroom Fried Rice

Leftover Thanksgiving Turkey and Mushroom Fried Rice.

Leftover Thanksgiving Turkey and Mushroom Fried Rice

Hello everybody, I hope you're having an amazing day today. Today, I'm gonna show you how to prepare a special dish, leftover thanksgiving turkey and mushroom fried rice. It is one of my favorites food recipes. This time, I'm gonna make it a little bit unique. This will be really delicious.

Leftover Thanksgiving Turkey and Mushroom Fried Rice is one of the most well liked of current trending meals on earth. It is appreciated by millions daily. It is easy, it is fast, it tastes delicious. Leftover Thanksgiving Turkey and Mushroom Fried Rice is something which I've loved my entire life. They're fine and they look fantastic.

To get started with this recipe, we have to prepare a few components. You can cook leftover thanksgiving turkey and mushroom fried rice using 11 ingredients and 5 steps. Here is how you can achieve it.

The ingredients needed to make Leftover Thanksgiving Turkey and Mushroom Fried Rice:

  1. {Prepare 2 of eggs, beaten.
  2. {Take 1 of onion , diced.
  3. {Take 2 of scallion, diced.
  4. {Take 10 of cremini mushrooms diced.
  5. {Get 2 cup of Brown rice, left over rice that's been refrigerated over night works best.
  6. {Get 1 tbsp of soy sauce.
  7. {Make ready 1 of salt and pepper to taste.
  8. {Get 2 tbsp of avocado oil.
  9. {Make ready 1 each of cayenne and chili powder tsp.
  10. {Make ready 1 tsp of garlic powder.
  11. {Take 1 cup of leftover turkey meat, diced..

Steps to make Leftover Thanksgiving Turkey and Mushroom Fried Rice:

  1. Place oil into pan or wok on high heat and sautee onion until translucent..
  2. In a separate pan, scramble egg, add some salt, remove and put aside..
  3. Put diced turkey into onion and mix. Stir fry for 5 min.
  4. Add rice and rest of the ingredients. Stir fry for 10 min until brown and heated through.
  5. Add egg last and mix well. Season with salt and pepper to taste..

So that is going to wrap it up for this exceptional food leftover thanksgiving turkey and mushroom fried rice recipe. Thanks so much for reading. I am sure you can make this at home. There is gonna be more interesting food in home recipes coming up. Remember to bookmark this page on your browser, and share it to your loved ones, colleague and friends. Thanks again for reading. Go on get cooking!

Simple Way to Prepare Speedy Brookies (brownie cookie)

Simple Way to Prepare Speedy Brookies (brownie cookie)

Brookies (brownie cookie).

Brookies (brownie cookie)

Hello everybody, it's Louise, welcome to my recipe site. Today, I will show you a way to make a special dish, brookies (brownie cookie). It is one of my favorites. For mine, I am going to make it a little bit tasty. This will be really delicious.

Brookies (brownie cookie) is one of the most well liked of current trending meals on earth. It is easy, it is quick, it tastes delicious. It is appreciated by millions every day. They are nice and they look wonderful. Brookies (brownie cookie) is something which I have loved my entire life.

To get started with this particular recipe, we must first prepare a few ingredients. You can cook brookies (brownie cookie) using 4 ingredients and 6 steps. Here is how you can achieve it.

The ingredients needed to make Brookies (brownie cookie):

  1. {Make ready 1 packages of of store bought brownie mix (or homemade).
  2. {Make ready 1 packages of of premade store bought chocolate chip cookie dough (or use my/ your own recipe for chocolate chip cookies, leftover batter?!).
  3. {Make ready 1 of vegatable oil (per store bought mix instr).
  4. {Get 3 of eggs (per store bought mix instr).

Steps to make Brookies (brownie cookie):

  1. Pre heat oven to 325, prepare muffin tin with cups..
  2. Make both cookie/brownie mix how instructed in seperate bowls..
  3. Spoon out cookie dough into cups, press dough to bottom and form a flat layer, approx 1/2 inch from bottom of cup. You can eyeball amount, like a normal sheet cookie just pressed flat in cup..
  4. Spoon a heaping tablespoon of brownie mix over the top of cookie dough.Only fill cups 1/4-1/2 in from the top, they'll rise..
  5. Bake at 325 for approximately 20 min, depending on size cook time could vary. Check often with a toothpick if dough from cookie or brownie is on toothpick cook longer.
  6. Let cool. Cookies are very rich, I cut into manageable pieces. You can freeze these..

So that is going to wrap it up for this exceptional food brookies (brownie cookie) recipe. Thank you very much for your time. I am sure that you will make this at home. There is gonna be more interesting food at home recipes coming up. Remember to save this page on your browser, and share it to your loved ones, colleague and friends. Thank you for reading. Go on get cooking!

Step-by-Step Guide to Make Ultimate Chicken Instant Noodle Soup

Step-by-Step Guide to Make Ultimate Chicken Instant Noodle Soup

Chicken Instant Noodle Soup. Instant Pot Chicken Noodle Soup made from scratch and in a fraction of the time. Delicious and hearty, loaded with noodles and chicken, this soup will warm the cockles of your heart. INSTANT POT CHICKEN NOODLE SOUP RECIPE

Chicken Instant Noodle Soup This tasty homemade chicken noodle soup is the most amazing comfort food ever! It's simple, with very few ingredients, and so easy to make in your Instant Pot®. Chicken noodle soup in an Instant Pot.

Hey everyone, it is me again, Dan, welcome to my recipe site. Today, I'm gonna show you how to make a special dish, chicken instant noodle soup. One of my favorites. For mine, I am going to make it a little bit tasty. This will be really delicious.

Chicken Instant Noodle Soup is one of the most well liked of recent trending meals in the world. It's appreciated by millions every day. It is easy, it's quick, it tastes yummy. They are nice and they look wonderful. Chicken Instant Noodle Soup is something that I've loved my entire life.

Instant Pot Chicken Noodle Soup made from scratch and in a fraction of the time. Delicious and hearty, loaded with noodles and chicken, this soup will warm the cockles of your heart. INSTANT POT CHICKEN NOODLE SOUP RECIPE

To begin with this particular recipe, we have to first prepare a few components. You can cook chicken instant noodle soup using 8 ingredients and 4 steps. Here is how you can achieve it.

The ingredients needed to make Chicken Instant Noodle Soup:

  1. {Prepare of Any instant chicken noodle soup.
  2. {Get of provided chicken seasoning.
  3. {Prepare of water.
  4. {Get of CHICKEN HAM ADD ON OPTIONAL.
  5. {Take of thinly chicken ham.
  6. {Make ready of GARNISH OPTIONAL.
  7. {Make ready of dice mix red, green , yellowand orange jalapeño.
  8. {Prepare of fresh coriander leaf.

I didn't make homemade soups at all before this one and now I'm a believer. Want to make chicken soup in the How long can you keep chicken noodle soup in the fridge? Homemade chicken noodle soup is so comforting and great to have on hand for chilly nights or when you're feeling under the weather. You can use gluten-free noodles in place of egg noodles if you have an intolerance or gluten allergy.

Steps to make Chicken Instant Noodle Soup:

  1. BRING WATER TO A BOIL THEN ADD NOODLE AND SIMMER FOR 2 MINUTES.
  2. ADD THINLY SLICED CHICKEN HAM AND SIMMER FOR ANOTHER 1 MINUTE.
  3. OFF HEAT ADD GARNISH AND MIX WELL.
  4. SERVE IMMEDIATELY.

You don't need an Instant Pot to make this, but I did provide. This soup reheats beautifully—but again, you'll want to leave out the noodles. When cooking is complete and air has been naturally released from Instant Pot, carefully remove lid and use tongs to remove chicken breasts onto a plate or cutting board. Made in the Instant Pot, this one-pot chicken noodle soup is just like the classic, loaded with juicy pieces of chicken, chunky vegetables, just-tender egg I used to believe eggs were the best thing you could make in your Instant Pot, but that was before I made a big batch of chicken noodle soup. Chicken Noodle Soup is everyone's favorite soup, especially during Fall or Winter.

So that is going to wrap it up with this exceptional food chicken instant noodle soup recipe. Thank you very much for your time. I am sure you will make this at home. There is gonna be more interesting food at home recipes coming up. Remember to save this page in your browser, and share it to your family, friends and colleague. Thanks again for reading. Go on get cooking!

Step-by-Step Guide to Prepare Ultimate Bee hoon soup with dong cai and
egg

Step-by-Step Guide to Prepare Ultimate Bee hoon soup with dong cai and egg

Bee hoon soup with dong cai and egg.

Bee hoon soup with dong cai and egg

Hello everybody, hope you're having an incredible day today. Today, we're going to prepare a distinctive dish, bee hoon soup with dong cai and egg. It is one of my favorites food recipes. This time, I am going to make it a bit tasty. This will be really delicious.

Bee hoon soup with dong cai and egg is one of the most well liked of current trending foods on earth. It is simple, it is fast, it tastes delicious. It's enjoyed by millions every day. Bee hoon soup with dong cai and egg is something which I have loved my whole life. They are nice and they look fantastic.

To begin with this particular recipe, we must prepare a few components. You can cook bee hoon soup with dong cai and egg using 8 ingredients and 4 steps. Here is how you cook it.

The ingredients needed to make Bee hoon soup with dong cai and egg:

  1. {Prepare of Main.
  2. {Make ready of bee hoon (rice vermicelli).
  3. {Get of egg.
  4. {Prepare of dong cai (preserved Chinese cabbage).
  5. {Get of Other.
  6. {Prepare of water.
  7. {Prepare of white pepper powder.
  8. {Get of sesame oil.

Steps to make Bee hoon soup with dong cai and egg:

  1. Give dong cai a quick rinse and drain to remove impurities while retaining its flavor..
  2. Boil water in a small pot. When water starts boiling, cook bee hoon for not more than 2 minutes..
  3. Add dong cai and crack egg into pot. Give a quick stir to the ingredients till soup turns milky..
  4. Serve in a big bowl. Add sesame oil and white pepper powder to taste..

So that is going to wrap this up with this special food bee hoon soup with dong cai and egg recipe. Thank you very much for your time. I am confident that you will make this at home. There's gonna be interesting food at home recipes coming up. Remember to bookmark this page on your browser, and share it to your family, colleague and friends. Thanks again for reading. Go on get cooking!

Step-by-Step Guide to Prepare Favorite [Ghibli] Totoro Character Cookies

Step-by-Step Guide to Prepare Favorite [Ghibli] Totoro Character Cookies

[Ghibli] Totoro Character Cookies.

[Ghibli] Totoro Character Cookies

Hey everyone, hope you are having an amazing day today. Today, I'm gonna show you how to make a distinctive dish, [ghibli] totoro character cookies. One of my favorites. This time, I'm gonna make it a little bit tasty. This is gonna smell and look delicious.

[Ghibli] Totoro Character Cookies is one of the most popular of current trending meals in the world. It is appreciated by millions every day. It is easy, it is fast, it tastes delicious. [Ghibli] Totoro Character Cookies is something that I have loved my whole life. They're nice and they look fantastic.

To get started with this recipe, we must first prepare a few components. You can have [ghibli] totoro character cookies using 13 ingredients and 16 steps. Here is how you cook that.

The ingredients needed to make [Ghibli] Totoro Character Cookies:

  1. {Take 1 of [Plain cookie dough] Refer to Miltie's recipe.
  2. {Prepare 120 grams of * Cake flour.
  3. {Make ready 40 grams of * Sugar.
  4. {Take 60 grams of * Margarine.
  5. {Make ready of [Leaves].
  6. {Make ready 1 of spoonful which comes with the food coloring or a few drops * Green food coloring.
  7. {Take of [Soot Sprites].
  8. {Make ready 2 tbsp of * Cocoa powder.
  9. {Get of [Large Totoro].
  10. {Get 1 tbsp of * Ground black sesame seeds.
  11. {Make ready 1 of * Black sesame seeds.
  12. {Prepare of [Eyes].
  13. {Get 1 of * Chocolate chips.

Instructions to make [Ghibli] Totoro Character Cookies:

  1. Combine the cake flour and sugar, add and cream the margarine, then knead with your hands until the dough comes together..
  2. Divide the dough into 3 big pieces and 1 little piece (for the leaves). Add the coloring ingredients to each piece and knead the different colors of dough until the coloring is evenly distributed..
  3. Chill the dough in the freezer for about 5 minutes (it will be hard to form the dough if it is soft)..
  4. Soot Sprites! Roll out the cocoa cookie dough into circles. Use plain cookie dough to make two small circles for the eyes..
  5. Little Totoro! Roll out the plain cookie dough into an egg shape. Create 2 small triangles for the ears and 2 small circles for the eyes, and assemble them to make a little Totoro..
  6. Large Totoro! Roll out the black sesame cookie dough into an egg shape and make 2 small triangles for the ears. Assemble them to make a large Totoro..
  7. Roll out the plain cookie dough into 2 circles for the eyes and an oval shape for the belly, and place them on the large Totoro's body..
  8. Place pairs of 2 grains of black sesame seeds together on the belly and push them in to make the pattern as shown in the picture (3 on top and 4 at the bottom)..
  9. Place chocolate chips on the centers of the eyes of the Soot Sprites, Little Totoro, and Large Totoro..
  10. Make the green cookie dough into leaf shapes and place them on the heads of the Little Totoro and Large Totoro..
  11. Bake the dough in an oven preheated to 170℃ for 12-15 minutes and let cool..
  12. Adjust the baking time according to the oven manufacturer's recommendations. The plain dough was overdone at 15 minutes with my oven..
  13. Ponyo cookies.
  14. Porco Rosso cookie.
  15. Kodama cookie.
  16. Jiji cookie.

So that's going to wrap it up with this exceptional food [ghibli] totoro character cookies recipe. Thanks so much for reading. I'm confident you can make this at home. There is gonna be interesting food at home recipes coming up. Remember to bookmark this page on your browser, and share it to your loved ones, colleague and friends. Thanks again for reading. Go on get cooking!

How to Make Perfect Nigeria fried rice

How to Make Perfect Nigeria fried rice

Nigeria fried rice. Fried rice is one of the most widely eaten Nigerian food; it is accepted by almost every Nigerian both at home and in Diaspora. I will be showing you how I make it. Nigerian Fried Rice is a very simple yet delicious recipe.

Nigeria fried rice Please watch in HD for better quality. For a list of all the ingredients used. Nigerian Fried Rice puts a spicy, flavorful spin on the traditional fried rice and is appealing on its own or served with a variety of other African food.

Hey everyone, I hope you're having an incredible day today. Today, we're going to make a distinctive dish, nigeria fried rice. One of my favorites. This time, I will make it a little bit tasty. This will be really delicious.

Nigeria fried rice is one of the most popular of recent trending foods in the world. It is appreciated by millions daily. It's easy, it's quick, it tastes delicious. They're nice and they look wonderful. Nigeria fried rice is something that I have loved my whole life.

Fried rice is one of the most widely eaten Nigerian food; it is accepted by almost every Nigerian both at home and in Diaspora. I will be showing you how I make it. Nigerian Fried Rice is a very simple yet delicious recipe.

To begin with this particular recipe, we have to prepare a few components. You can have nigeria fried rice using 21 ingredients and 7 steps. Here is how you cook that.

The ingredients needed to make Nigeria fried rice:

  1. {Prepare 400 g of long grainrice.
  2. {Take 600 ml of turkey.
  3. {Make ready 3 of large carrot.
  4. {Make ready 1 handful of peas and runner beans.
  5. {Prepare 2 of large green pepper.
  6. {Take 2 of onion bulb.
  7. {Take 3 of tabspoonful curry powder.
  8. {Get 1 teaspoon of ginger powder.
  9. {Make ready 3 of glove of garlic.
  10. {Get 2/3 spoonful of black pepper.
  11. {Get 3 of cooking spoonful vegetable oil.
  12. {Take 3 of stock cube (know chicken).
  13. {Prepare to taste of salt.
  14. {Make ready 500 g of Chicken/Turkey thighs or drumsticks(cooking the chicken).
  15. {Get 1 teaspoon of thyme.
  16. {Make ready 1 teaspoon of curry.
  17. {Take 1 of medium onion.
  18. {Get 1 of glove garlic.
  19. {Get 1 of small yellow pepper.
  20. {Make ready 1/2 of ginger powder.
  21. {Make ready 2 of stock cube (knowr).

Nigerian Fried Rice is a rice dish that has a continental taste and look. This Nigerian rice meal is a party favourite. Learn how to cook the perfect Nigerian Fried Rice. Divide the Nigerian fried rice among individual plates and serve hot alongside the grilled chicken thighs.

Steps to make Nigeria fried rice:

  1. Add a little water and cook the chicken for 10 minutes. Then add more water and cook until done.     The liquid left after cooking the chicken,is your stock. Pour the  stock into a Strainer to remove tiny chicken bones and any other particles in it; then set the stock aside for later use.. Wash and place the cow liver in a pot, add seasoning cube and salt to taste; Cook the liver for 10minutes, then when cooled,cut into cubes and set aside.   Liver can also be fried, before cutting into cu.
  2. Wash all the vegetables.         Dice the onion & set aside ;  Peel the carrots & cut into small cubes. Remove the seeds of the green bell peppers & cut into small cubes. Place the carrots & green peas in boiling water for 5 minutes, strain out and place in a bowl of cold water, leave to cool in the water, then pour into a sieve and set aside..
  3. This method is called blanching. It helps to par-boil the vegetables without cooking it through, thereby cutting down the stir-frying process. It also helps to preserve the vibrant color of the vegetables.. Place the reserved chicken stock into a large pot and bring to a boil. The stock should be at almost the same level as the rice, so that it dries up completely when the rice is done.   You can add some water if the stock won't be enough to cook the Rice..
  4. As the stock begins to boil, add the parboiled rice, seasoning cubes(stock cubes), curry powder, garlic powder, onions and salt to taste. Leave to cook on medium heat until it's done.   TIP; The cooked rice should not be soggy or too tender and the grains shouldn't stick together either.   You can Pour out the cooked rice into a wider pot and set aside..
  5. Heat up the vegetable oil; add the carrots, peas, green bell pepper and diced liver/meat; then add a little white/black pepper, a garlic, curry &seasoning cube to taste..  stir fry for 1 min.
  6. The Rice is going to be fried in small batches, so you'll have to divide the stir-fried vegetables into equal portions. The size of your frying pan/wok will determine how many portions you will have.     7. Pour a portion of the stir-fried mix into the frying pan; add the cooked rice and stir-fry for about 2 minutes. Do not overcrowd the pan,make sure there is a little space in the pan so that you can move the rice around the pan for even distribution of heat..
  7. Repeat this process for the remaining rice and veggie mix. Now your Nigerian Fried Rice is Ready to be serve.

Fried rice is one of the most popular Nigerian food and this recipe shows you how to easily make it. Rice is a very popular food in Nigeria, it would most likely come first on the list of foods eaten in. Nigerian fried rice is one of the most popular rice recipes in Nigeria. It has become a big party favorite and one of the most sought after delicacies in any festive gathering. The second most popular rice dish in Nigeria; A must have at parties and a major meal in most homes.

So that is going to wrap this up with this exceptional food nigeria fried rice recipe. Thanks so much for reading. I am sure you will make this at home. There is gonna be more interesting food in home recipes coming up. Don't forget to save this page in your browser, and share it to your family, friends and colleague. Thanks again for reading. Go on get cooking!